Router Configuration
Router Cables
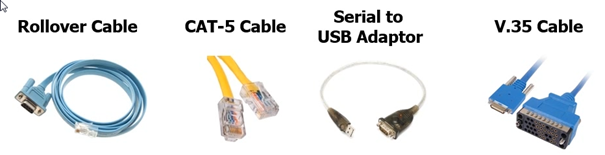
Roll over cable used to connect the router to a serial port on the PC – we use this to configure the router.
CAT 5 OR CAT6 cable to connect the router to a switch
Serial to USB, used to create Virtual Com Port so that we can connect to the router when a Laptop does not have a RS 232 Serial Port
V.35 cable used to connect High-speed T1 1.5mbit (old school), it’s very rare that we use this cable today.
Typically the CAT cable is what is used today to configure CISCO routers
Back side of the router
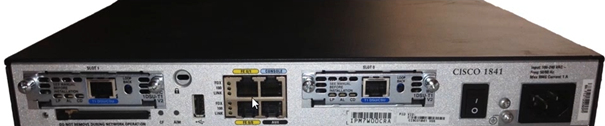
Ports and Sockets on an 1841 router
Power – 3 Pin Kettle cable socket
Power switch – Power on or power off
Slot 0 / Slot 1. – 1DSU-T1 card (Serial port) used connect T1 Lines (1.5mbit) for WAN, this modules work at the network layer and need to be used with IP addresses, Slot 0 and 1 are modular slots, that means we can plug in different modules, for example more Ethernet ports, or a little switch, we can add security modules.
FE 0/1 & FE 0/0 – this 2 ports are fast Ethernet ports (100mbit) *when we refer to Ethernet it’s a 10mbit, Fast Ethernet is 100mbit, GE refers to 1000 mbit (Gigabit Ethernet), on the 1841 router we have 2 fast Ethernet ports, these 2 ports on the 1841 router are used for data transfer, these ports use CAT cables with a RJ45 end.
Console and AUX have a RJ-45 type sockets but it is not a fast Ethernet ports. These ports however only pass data at the data link layer, and are used for base configuration. A router by default is essentially without configuration when packed out of the box, all ports are disabled, only the Console and AUX port. The console port allows you to connect the roll over cable to configure the router. The AUX port allows you to connect a modem so you can connect to the router via Dialup Modem via telephone line, it could be you’re not able to access the router via Internet so the AUX port allows you to manage the router via telephone line.
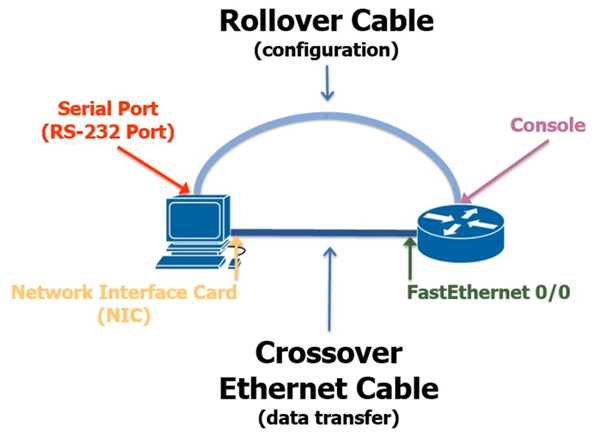
Connecting your router to a PC.
In this example we connected the roll over cable and a cross over cable.
The cross over able connects from the PC to the Fast Ethenet port 0/0
The Roll over cable connects to the RS-232 port (Serial Port ) on your PC or if you don’t have one on your PC you can use USB to serial, and we connect the serial cable to the console port on the router.
*A tip don’t buy a cheap USB to serial adapter, they often have problems and its worth paying a little more for a good one from Keyspan 19HS usb to serial adapter
So now we can begin configuring the router. We will use the following example
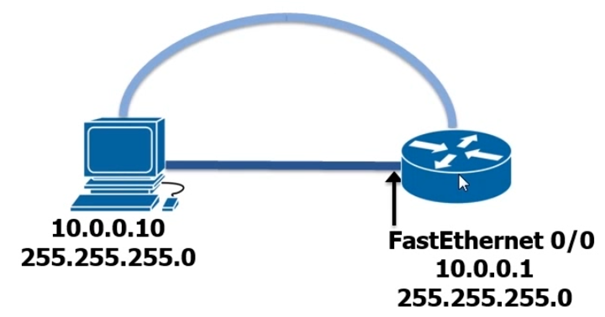
Connect the roll over cable from serial port on the PC to the console port on the router
Connect your CAT cable from the ether port on the PC to fast Ethernet 0/0
Install Putty on your PC which will allow us to connect from the PC to the router via terminal
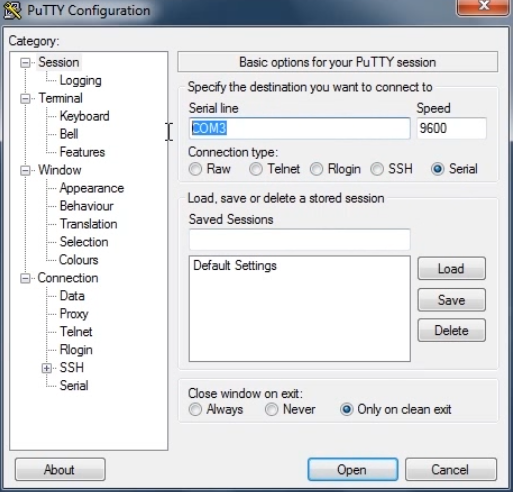
You need to know what serial Port your using to connect the PC to the router. Once you have your com port just select open in Putty and your will be presented with a black screen, Hit Enter and you will see the following screen

Answer No if it asks you about starting auto config also answer no. The reason for answering no is because the application CISCO wrote for setting up the configuration is slow and tedious.
You should the following:
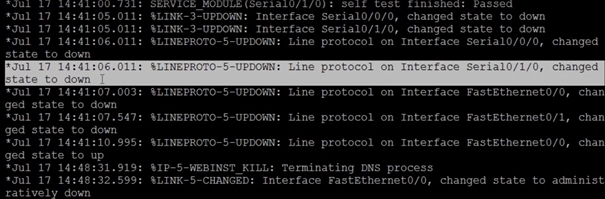
These log lines are generated from the router, checking interfaces and statuses about the ports on the router. When the checks are complete you simply hit enter and it will eventually give you the command prompt

Where it says router this is the default host name
where it the “>” at the enter of where it says router its indicating a which mode you are using
There are 3 different modes.
User mode “>”
Privileged mode “#”
Configuration mode
User mode When we have see Router> we are in user mode. User mode allows the user to logon to the router and issue very basic commands to the router. You will not be able to do any configuration, you can only logon and you can look at statistics and other information, user mode is relatively useless. As an administrator, we always want to be in the next mode up which is privileged
Privileged mode allows an admin to show sensitive information and configure the router. To get in privileged mode type enable, now you will see the command prompt change to Router#, the hash indicates you are now in privileged mode. In privileged mode we can now can now access configuration mode by entering the following at the command prompt
Router# config terminal
Configuration mode – Inside of configuration mode we have global configuration mode and Sub configuration mode.
If we were to configure an Interface port for example
Interface fastethernet 0/1 the command prompt would switch to Router#(config-if) “if” means interface
Config-if means configure Interface
8.Now exit the configuration mode using exit command
9. Now you are in Privileged mode, type exit again and you are now in USER mode.
Configuring a password for USER mode.
To configure a password for user mode we need to go into config mode, by default there are no passwords.
1. In the command prompt type enable and hit enter
2. Your now in privileged mode. Now type config terminal and hit enter
3. Now you’re in Configuration mode, type line console 0 and hit enter
4. Now you will see the command prompt change to Router (config-line)# now we can enter commands to tell line console 0 how to behave.
5. Now we enter the following command password cisco hit enter
6. Now we have to configuration to prompt the user with login, so we set the login with the login command.
7. Now we run the end command#
8. Now log out of the router and log back in to the router and you should see the following

Setting the AUX port password
1. cnable – to get to privilege mode
2. config terminal
3. config line aux 0
4. password cisco
5. Now issue the login command
Never set your password to cisco, this is just for learning purposes, make sure you use a complex password.
Configuring virtual terminals.
Virtual Terminal lines are configure so more than 1 session can take place, say for example a switch needs a lot of configuration applied to it, maybe we need to 3 of 4 people to login and share the configuration work. On a CISCO 1841 we can have up to 808 virtual lines you can talk to, why ? Well if we have 2 possibilities to connect via the AUX or Console port this allows only 2 and we need to be standing near the router because of the serial cable, so if we wanted the 4 or 5 admins to configure the router then we need another method this is where the line line vty command is useful.
1. Login to the router and get to configuration mode
2. Use the following command line vty 0 4 this will allow us to connect to the router at distance of the network and allow 45 connnections 0, 1, 2, 3, 4,
3. Set the password by typing password cisco
4. Now use the login command to set the password
5. Now type exit command
How to check if the password is set in the router
1. Login in to the router in privilege mode
2. Now type the show running-config command
3. Now the Router will show the configuration, hit space enter to see one line at a time, if you want to see one page at a time hit space.
4. If all is configured properly you should see the following

Setting up a password for a user to go from user mode to privilege
1. Go to global config mode and enter the enable secret cisco command
2. Now enter the exit command
3. Now enter show run command
4. Now you should see in the log lines the following

This is CISCO password hidden but not really encrypted. It just keeps the password hidden from plain site.
Now logout the router and log back in you will see it asks for a password. The router has very basic password.
How to change the Host Name and Banner.
How to change the host name
1. Open putty connect
2. Enter command enable and enter password cisco
3. Now enter the command config t
4. Now to change the switch name by entering the command hostname sw-bm-001
How to create a banner
1. While you’re still in global configuration mode enter the banner command, when entering you banner message make sure you put a # at the beginning and the end also #, banner #This switch was installed by Robert Welsh, if you need technical support please call 0900 900 001#.
2. Now exit and log back on and you should see the banner message.
Configuring IP addresses / Subnetmask on interfaces and changing the interface state.
In this example we want to put an IP address on fast etherent 0/0
1. Login to your router enable > config t
2. Now enter the following command interface fastethernet 0/0 this will bring you to (config-if)#
3. Now to assign the IP address type the following command ip address 10.0.0.1 255.255.255.0 hit enter
4. Now exit
5. Now enter the following command show interface fastethernet 0/0
6. Now you will see lots of text in appear in the terminal, we can see the IP address is configured and the subnet mask is configured, 10.0.0.1/24 (remember 24bit indicates 1111.1111.1111.0000 which = 255.255.255.0). Notice in the text the following highlighted line, fastethernet 0/0 is administratively down, line protocol is down.

1. In the previous screen shot “Administratively down, line down is indicating that 2 different States of the OSI model, line protocol is the layer 2 protocol in other words “Datalink layer ‘ethernet’ is down. Administratively down indicates the Physical layer, the message can appear in 3 different states
· Administrativley down – means the interface is physically shutdown, this means a command has been sent to shut down the interface. Interfaces on CISCO interfaces when they come are set to default in the down state.
· Down – Means that it is ready and has the potential to come up but maybe needs a cable connected, or maybe there is a bad cable connected to it, or maybe the switch it is hooked upto is powered off, or a pc its attached to is powered off
· Up – means we have some physical connectivity of some kind, we will see the “Administratively up” in the log lines when the port Ethernet is up
Setting an Ethernet Interface to administratively up state
1. config t
2. interface fastethernet 0/0
3. no shutdown – the no shutdown command will change the state to up

1. now use the show running-config , you should see something like the following screenshot
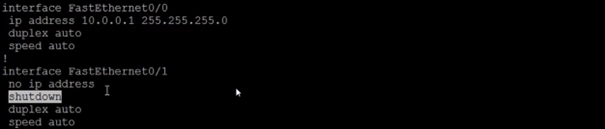
As you can see fast Ethernet 0/0 is up, you can see this as it is saying that 10.0.0.1 is set to duplex auto and speed auto, and does not say anything about shutdown.
Also you can see the interface 0/1 is not configured and it is in shutdown.
1. Lastly configure your PC to match the network portion of the router and ping your router.

Quick Summary of Configuring a router.
1. Connect your Cat cable to Fast ethernet 0/0 on the Router.
2. Connect your RS-232 to your console port.
3. Install PUTTY connect via COM port to console.
4. Once connected to the router via Putty Hit Enter.
5. Next select No and No to any other questions
Configure user password for console
1. Type enable in the command prompt
2. Type config terminal
3. Type line console 0
4. Type password cisco or one of your choice
5. Type end logout and log back in
Configure Aux user
1. Type enable
2. Type config Terminal
3. Type config line aux 0
4. Type password cisco
5. Type login command
Configure Virtual terminal sessions
1. Type enable
2. Type config t
3. Type line vty 0 4
4. Type password cisco or one of your choice
5. Type login
Check the passwords are set for the router
1. Type enable
2. Type show running-config
Configure password to go from user mode to privilaged mode
1. Type enable secret password cisco or a password of your choice
2. Type exit
3. Type show run
Change Host name and banner
1. Type enable and enter password
2. Type config t
3. Type hostname sw-bm-001 or name of your choice
4. Type banner #for technical suppport call 0900 900 cc
Configure IP address Subnet mask for Interfaces
1. Type enable
2. Type config t
3. Type interface fast ethernet 0/0
4. Type IP address 10.0.0.1 255.255.255.0
Set Ethernet Port to from down state to up
1. Type config t
2. Type interface fastethernet 0/0
3. Type no shutdown
4. ping Router from PC
Save startup config ?